
Create stunning timelapses with just one application.
Stop switching between multiple software. From importing raw files to exporting your final video, everything you need is built right in.
Master all kind of Timelapse
Whether you are shooting landscapes, cities, or the night sky, our tools adapt to your specific workflow.
Holy Grail
Seamless day-to-night transitions never been so easy.
Startrails
Built in stacking algorithm for breathtaking night skies.
Bracketing captures
HDR merging for perfect dynamic range is now possible for timelapses
From RAW import to video export
All the built-in tools you need, in the perfect order and fast processing.
1
RAW Import
Import your sequence from multiple cameras, create proxy to speed up the process, analyse the timelapse capture quality to detect any issue before processing the sequence…
2
Keyframes
Automatic scene luminosity analysis and automatic Keyframes placement to get smooth out exposure transitions effortlessly. Manual keyframing still possible for custom or creative adjustments.
3
Grading
Process your massive RAW sequences efficiently with our custom GPU based 32bit engine. All built-in tools from standard photo software industry included. Add masks to be more precise on your grading
4
Deflicker
Advanced algorithms to eliminate any light flickering and ensure buttery smooth playback…just in few seconds!
5
Video Corrections
Fix distortions, adjust framing, remove lens vigneting, apply stabilization, dust removal, objects removal, noise reduction, motion blur, sharpening…
6
Video Effects
Add Pre included LUT or import custom LUT, add effects like Orton effect, Glow effect, Tilt shift, and many more before the final render.
7
Final Export
Render your masterpiece in Video (Prores, DNxHR, H.265…) or Photo Sequence (EXR, TIFF, PNG…) up to 4K resolution. Adjust the timeline duration, the speed, and create multiple render queue with different format or aspect ratio for develivery on different platforms…
Making timelapse never been so easy
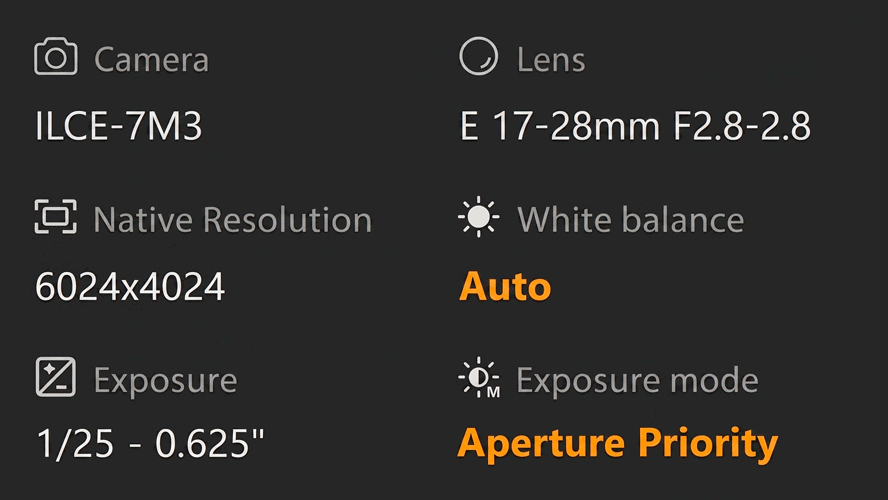
Timelapse Capture Warnings: Ensure peak quality from the start
Automatically detect captures deviations in your sequence to warn you before you start editing and ensure the best timelapse quality (White balance, Shooting mode, Focus mode, Aperture…)
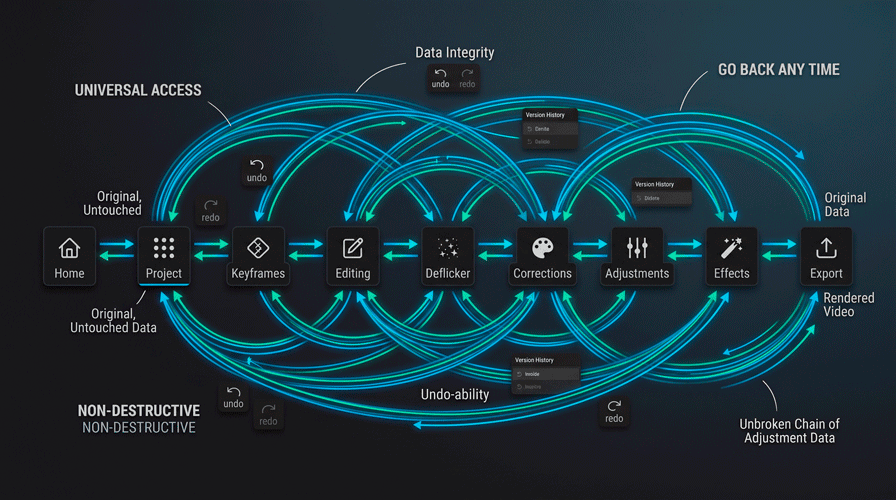
Non-Destructive Workflow: Total Flexibility, Zero Rework
Jump to any previous step at any time without losing your progress.
Live propagation: Tweak exposure, refine deflicker, or grading your colors—every change instantly ripples through the entire pipeline.
Preserved integrity: Your source RAW data stays untouched, giving you the freedom to experiment and iterate fearlessly.
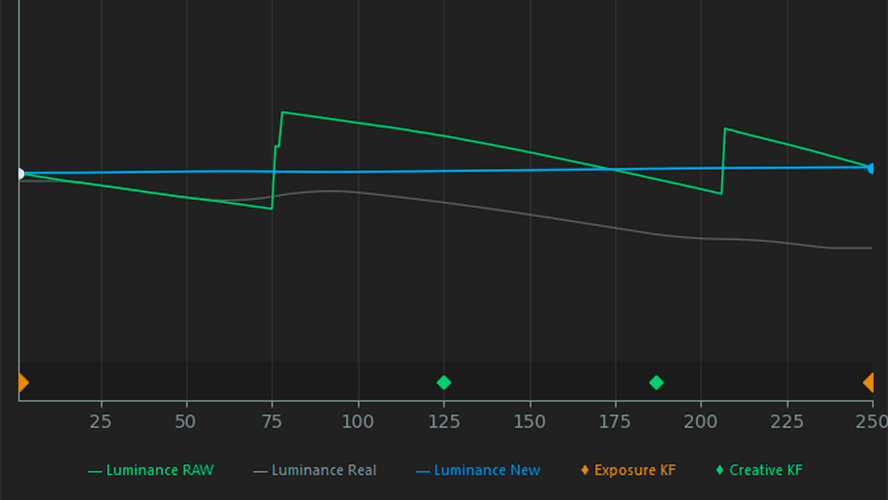
Smart Auto Keyframing: Flawless Transitions in Seconds
Let the AI analyze your sequence and generate the optimal exposure ramping curve automatically.
Seamless ramping: Perfectly smooth holy grail and day-to-night transitions without setting a single manual point.
Full creative freedom: Add, tweak, or override keyframes at any time for total custom control.
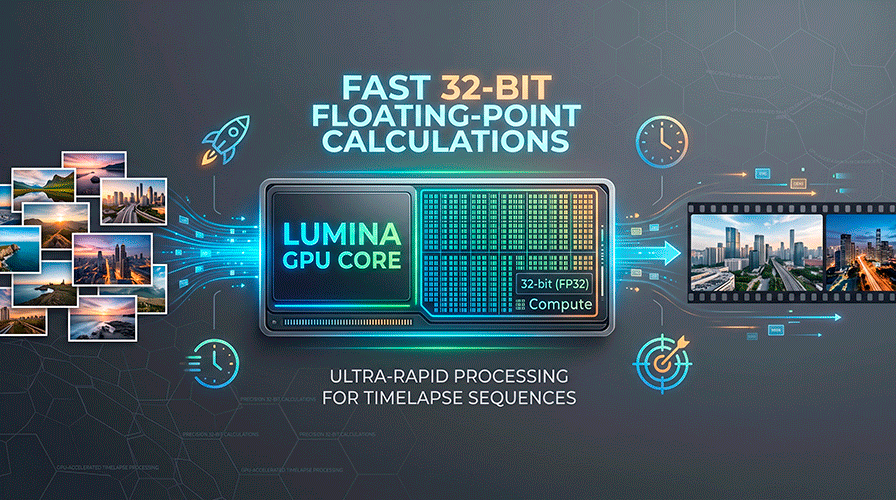
32-bit GPU Processing: Raw Power for Your Timelapses
Built to handle hundreds of high-resolution RAW frames effortlessly, Lumina harnesses your GPU’s full potential with an internal 32-bit floating-point (FP32) engine.
Zero quality loss: Smooth sky gradients with no banding or clipping, even during extreme day-to-night transitions.
Blazing speed: Native GPU acceleration delivers real-time previews and rapid exports for massive 4K and 8K sequences.
Flawless color precision: Fully linear processing that preserves every detail of your original sensor data.
Frequently Asked Questions
No. Lumina Timelapse Studio is a fully autonomous, standalone application. It features its own high-performance RAW processing pipeline, non-destructive color grading tools, automatic deflickering algorithms, and video rendering engine. You do not need any third-party subscription or external software.
Currently, Lumina Timelapse Studio is exclusively available for Windows 10 and 11 (64-bit). Native versions for macOS (Apple Silicon & Intel) and Linux are actively planned and will be released once the core rendering engine reaches full maturity and stability on Windows.
Yes. In addition to English, Lumina Timelapse Studio is fully localized into seven languages:
French
German
Spanish
Brazilian Portuguese
Italian
Japanese
Simplified Chines
You can switch the interface language at any time by navigating to Settings > Interface and selecting your preferred language from the dropdown menu, then restart the application.
Because RAW image decoding and high-resolution video rendering are computationally demanding, and even if the software propose a Proxy based pipeline, we recommend the following specifications:
- Operating System: Windows 10 / 11 (64-bit only).
- Processor (CPU):
- Minimum: Modern Quad-Core CPU (Intel Core i5 10th Gen or AMD Ryzen 5 3000 series, ~3.0 GHz).
- Recommended: 8-Core CPU or higher (Intel Core i7/i9 or AMD Ryzen 7/9).
- Memory (RAM):
- Minimum: 16 GB.
- Recommended: 32 GB or more.
- Graphics Card (GPU): Dedicated GPU with DirectX 12 / Vulkan support and at least 6 GB of VRAM (NVIDIA GeForce RTX series, AMD Radeon RX 6000+, or Intel Arc).
- Storage: Fast internal NVMe / SSD drive strongly recommended for real-time frame caching and playback.
Lumina Timelapse Studio supports RAW files from all major camera manufacturers as well as industry-standard raster formats:
- Camera RAWs: Sony (
.ARW), Canon (.CR2,.CR3), Nikon (.NEF), Fujifilm (.RAF), Panasonic (.RW2), OM System / Olympus (.ORF), Leica & Pentax (.DNG,.PEF), and Hasselblad (.3FR).
- Raster Formats: Adobe Digital Negative (
.DNG), OpenEXR (.EXR), 16-bit uncompressed.TIFF,.PNG, and high-quality.JPEG.
- Free Version: Includes full access to the RAW editing tools, EV corrections, deflicker engine, and video export, but is limited to sequences of up to 100 images. We strongly advise downloading the Free version first to test performance and hardware compatibility on your machine before purchasing.
- Pro Version: Unlocks unlimited sequence lengths, full-resolution exports, commercial usage, and priority updates.
Each single-user Pro license key permits activation on up to two personal machines simultaneously (e.g., your studio workstation and your field laptop).
You can manage your license activation on your account
Configure your camera for shooting timelapse depends on your purpose and type of timelapse but to achieve smooth, flicker-free sequences straight out of the camera, you can apply this general rules :
- Exposure Mode: Always shoot in Full Manual (M) mode.
- White Balance: Lock your White Balance to a fixed Kelvin temperature or preset (Daylight, Cloudy). Never use Auto White Balance (AWB).
- Focus & Stabilization: Switch your lens to Manual Focus (MF) and turn off Optical / In-Body Image Stabilization (OIS/IBIS) when mounted on a tripod.
- Day-to-Night (Holy Grail) Adjustments: When ramping exposure manually during a transition, always adjust settings in this sequence:
- Step 1: Extend Shutter Speed first (up to the limit of your interval).
- Step 2: Increase ISO next.
- Step 3: Adjust Aperture last, as changing aperture modifies depth of field and lens vignetting, which can introduce physical optical variations.
More details and pro tips for timelapse shooting are available in the documentation.